How To Permanently Reorder Fields in ArcGIS

Rearranging Fields in ArcGIS
If you want to permanently reorder fields in ArcGIS, we have two ways to do it.
First, you can export your data and use the “field map” method.
Secondly, you can use the X-Ray Tool for Catalog. But this one takes a bit of time and effort.
So, let’s get started re-arranging your columns forever.
1. Field Map Technique
This method is a quick and dirty way to rearrange your fields. The best part? It works for both ArcGIS Desktop and ArcGIS Pro. Follow the instructions carefully below.
Step 1. Rename your feature
First, give your feature class a different name. If the name of your file is “feature.shp”, then change it to “feature_old.shp” in ArcCatalog.
Step 2. Export your data
Export your data by right-clicking your feature. But this time, you can give it the same name as before. In this case, rename your export file as “feature.shp”. But don’t hit the export button just yet because you need to rearrange your fields.
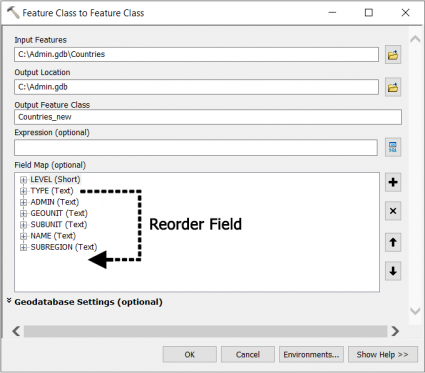
Step 3. Adjust the field map
By rearranging the fields in the “field map”, you can permanently change the order of your columns. If you want to move any fields to the right or left, then use the up or down arrow button.
2. X-Ray For Catalog
X-Ray for ArcCatalog is a whole other beast. In fact, you have to download it and install it as a stand-alone application.
The main purpose of the X-Ray add-in for ArcCatalog is to design and document geodatabases. It also provides a simple spreadsheet interface to your geodatabase.
Step 1. Download X-Ray for ArcCatalog
First, download the X-Ray Addin for ArcCatalog. As of today, the add-in is available for ArcGIS 10.2 to 10.8.
Step 2. Install X-Ray for ArcCatalog
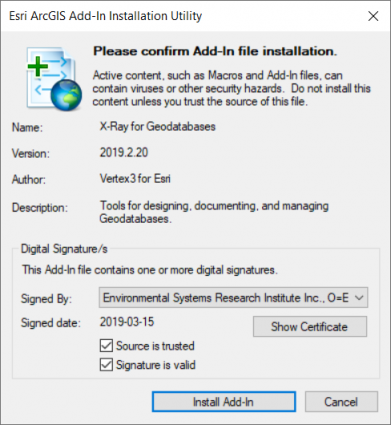
Find the XRayArcCatalog.esriAddIn file you just downloaded, and double-click it. In order to install the add-in file, you will have to confirm it is a trusted source. This add-in is a trusted source, so click the “Install Add-In” Button.
Step 3. Enable Extension
Now the extension is installed, the extension will be available in ArcCatalog. After opening ArcCatalog, click the Customize drop-down and select Extension (Customize > Extension). Finally, select and ensure there is a checkmark for “X-Ray Extension for Geodatabases”.

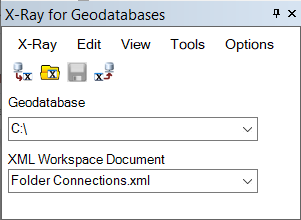
After enabling this extension, a new pane will show up with the “X-Ray for Geodatabases”.
Step 4. Reorder Fields Tool
As part of the X-Ray ArcCatalog Tool, it has a set of quick-and-dirty tools to set up the structure of your geodatabase. Specifically, it’s the Reorder Fields Tool that permanently moves your fields from a table.
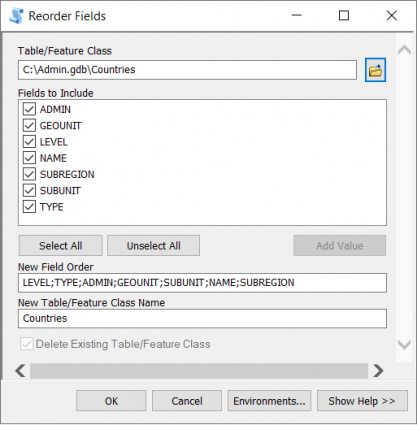
In the menu, click (Tools > Reorder Fields). Next, the tool will open and prompt you to add a table or feature class. After you add a feature class, the tool allows you to design your exported feature class in several ways:
- Field to Include – This option allows you to delete and omit them in your output.
- New Field Order – By using semicolons, you can permanently change the way your output fields are ordered.
- Delete Existing Table/Feature Class – You can overwrite your existing dataset or create a new one.
How To Permanently Reorder Fields in ArcGIS
Without a doubt, it’s a bit surprising why there isn’t a default ArcToolbox tool that does this. In fact, this request has been “in consideration” for over 10 years from users altogether.
Unfortunately, Esri has completely dropped the ball on this one. They’ve switched their focus on less-used tools like 4D space-time cubes that less than 1% of the community uses.
But there still is a bit of a curious disconnect between the Esri community and the development team.
Either way, do you know any other ways to permanently arrange fields in ArcGIS or ArcGIS Pro? Please let us know with a comment below.


It would be helpful to have a tool like apply symbology that would apply the same Field Order to multiple layers.
I work in ArcMap with Network Analyst Routes. These routes exist within the ArcMap file itself and do not have an external geodatabase. When a new Network Analyst Route is created, the Stops data table can be viewed and edited, but there is no way to rework the table. There are 25 fields of which I need 6 to be displayed in a specific order. The rest are superfluous to my process. I need to select my six fields manually, move them to the top, reorder them, and then shut off the visibility of the other 19 fields.
One map can have up to fifty Network Analyst Routes and One season can have 80 or 90 maps.
This might exist in XTools. They do have ways that you copy and paste symbology from layer to layer. As for ordering your fields, this also might be possible in XTools. I know Excel has options to order fields for how you want to sort (first, second, etc). XTools also allows you to update in Microsoft Excel.
Great tips! A similar one is to use the Merge tool, but only Merge your one feature class or shapefile. I believe this gives you even more options to change field names etc. It took me a long time to realize I could do this.