20 ArcGIS Pro Tips and Tricks
ArcGIS Pro is one of the most versatile GIS software in the industry today.
To help you get the most out of ArcGIS Pro, we’ve compiled a list of the top 20 tips and tricks.
These tips range from basic customization options to advanced geospatial analysis and data visualization tricks.
So let’s get started with these ArcGIS Pro tips and tricks.
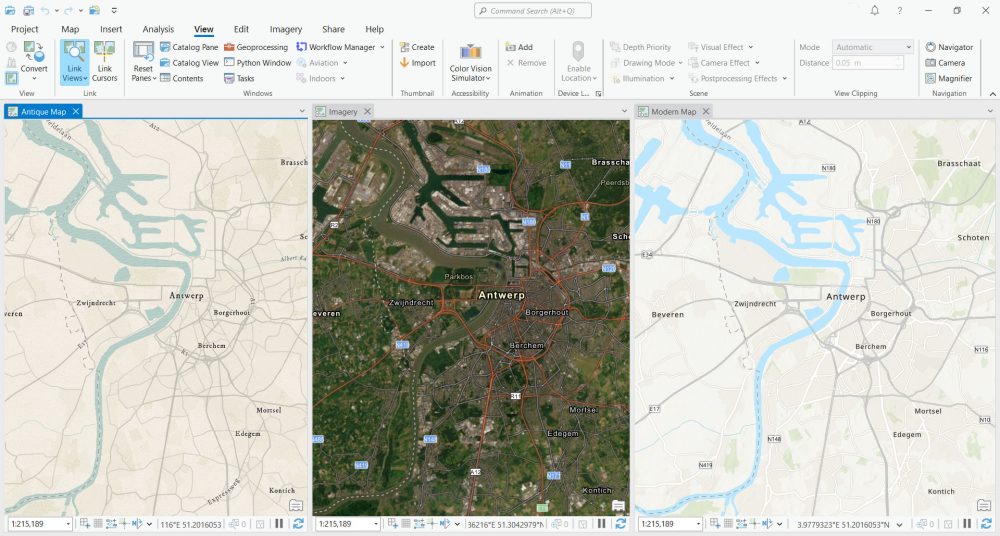
1. Linking Map Views
Linking views in ArcGIS Pro helps you synchronize the display of multiple maps or scenes in a project at the same time.
When you link views, changes made to one map or scene will be reflected in all the other linked maps or scenes simultaneously.
It’s great for comparing data across different layers. For example, you can compare a topographic map with aerial imagery.
You can also contrast different time periods of data to see temporal differences between map views.
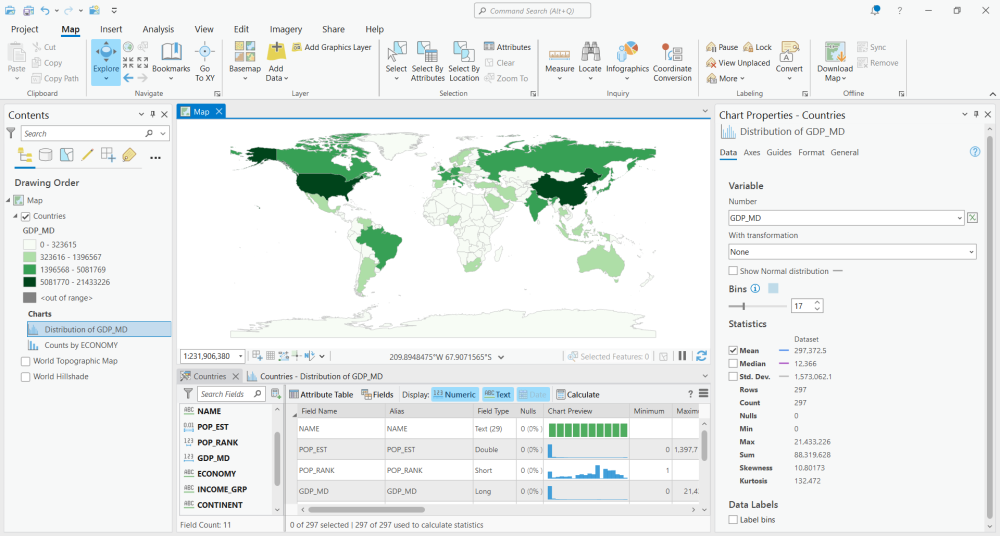
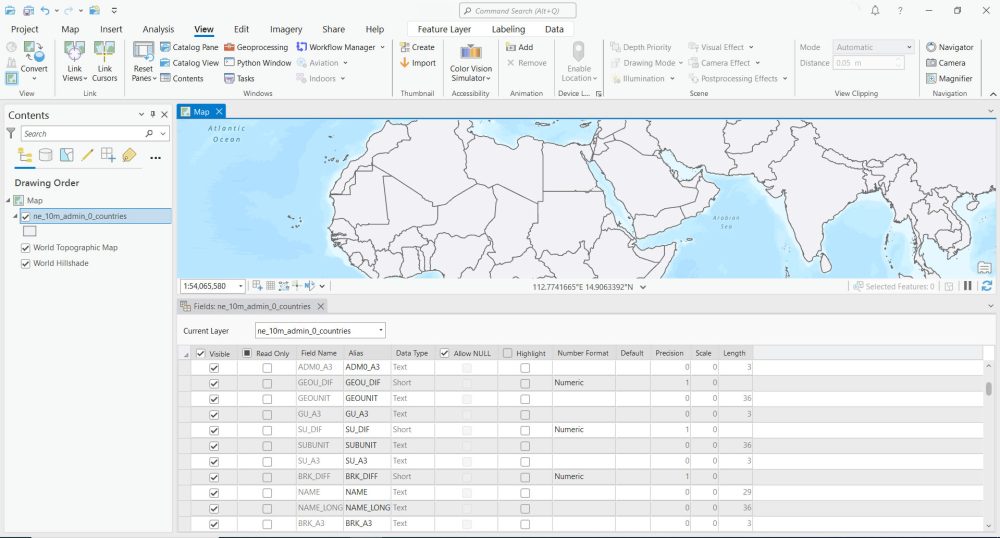
2. Data Engineering
ArcGIS Pro has all the tools for data engineering. It helps process, prepare, and optimize spatial data for analysis.
This includes various tasks like exploring, cleaning, integrating, transforming, and checking data quality. These tools allow users to automate and streamline data engineering in ArcGIS Pro.
You can create charts and graphs that go with your geospatial data. Its charting capabilities are one of the neatest things you can get out of this.
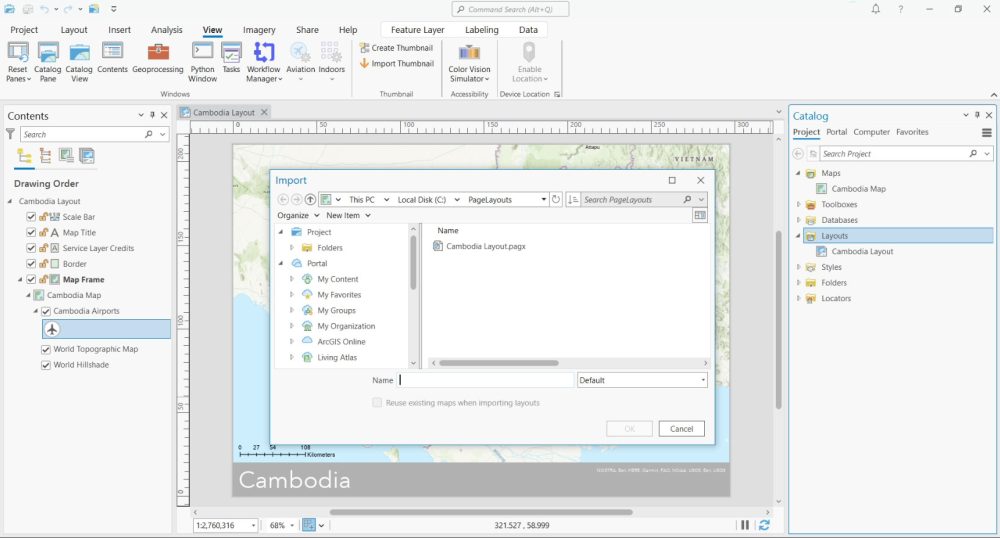
3. Layout Files
If you’ve ever wanted to create standardized map templates for your organization, you can do this with layout files.
When you import layout files, it contain all the map elements, datasets, data frames, text, graphics, and other elements. This is perfect for building professional-quality templates.
The main advantage of layout files is that once you import one, it will contain a layout and a map.
Both the map and layout are linked to each other, making it ideal for constructing map templates for any organization.
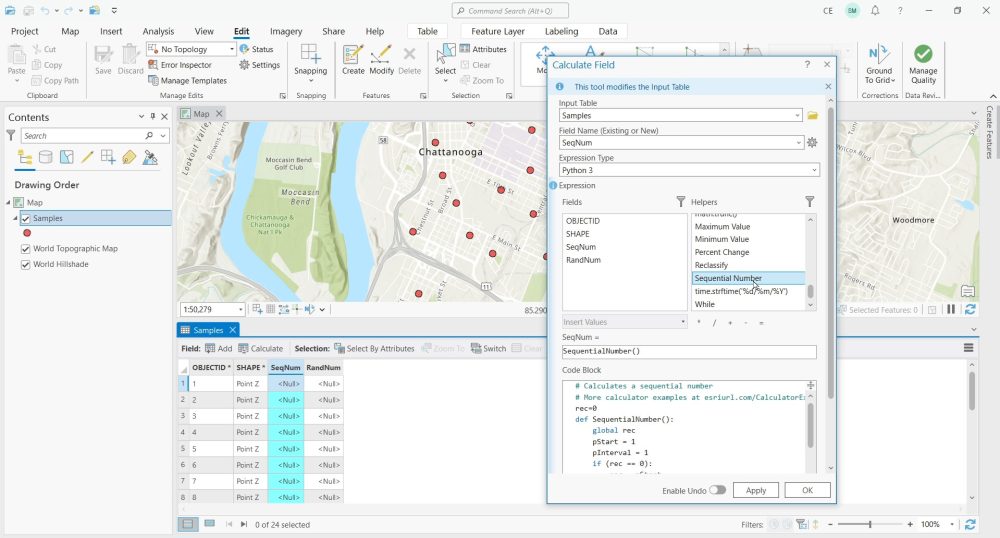
4. Field Calculator Helpers
If you want to automate any operation using the field calculator ArcGIS Pro, the easiest way to do this is by using “helpers”.
ArcGIS Pro helpers are pre-written pieces of code blocks that write the Python or Arcade code for you.
For example, you can create sequential or random numbers by using one of the helpers that are available.
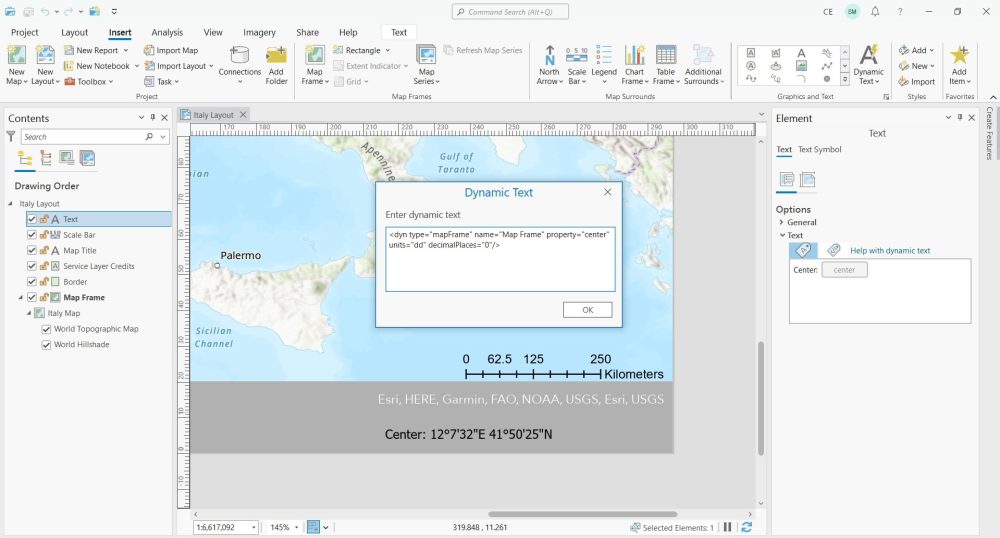
5. Dynamic Text
Dynamic text gives you an intuitive way to insert text elements into your map layouts. But what’s special about dynamic text is that it automatically updates based on your current map frame.
To insert dynamic text, it’s available in the “Insert” ribbon and by clicking the “dynamic text” drop-down.
From there, you can insert text like scale, service layer credits, time, date, field attributes, and coordinates. By using dynamic text, you can create more informative maps that are easier to maintain.
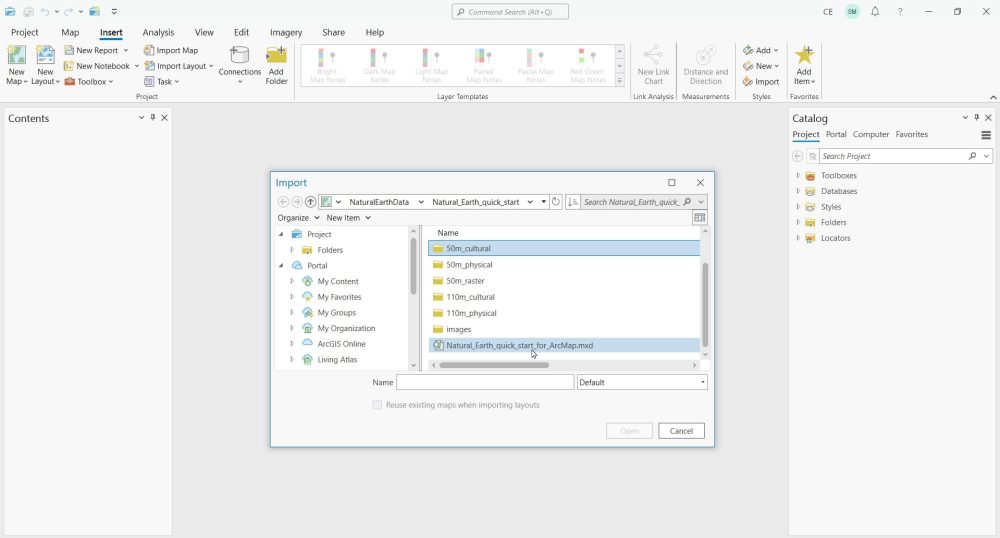
6. Importing MXDs
For anyone transitioning from ArcMap, ArcGIS Pro makes it really easy to transfer over any of your older MXD layouts.
From the “Insert” ribbon, you can select “Import Map” and this will allow you to add existing MXDs to ArcGIS Pro.
This tool is not only for importing an existing ArcMap document, but you can also import from ArcGlobe and ArcScene as well.
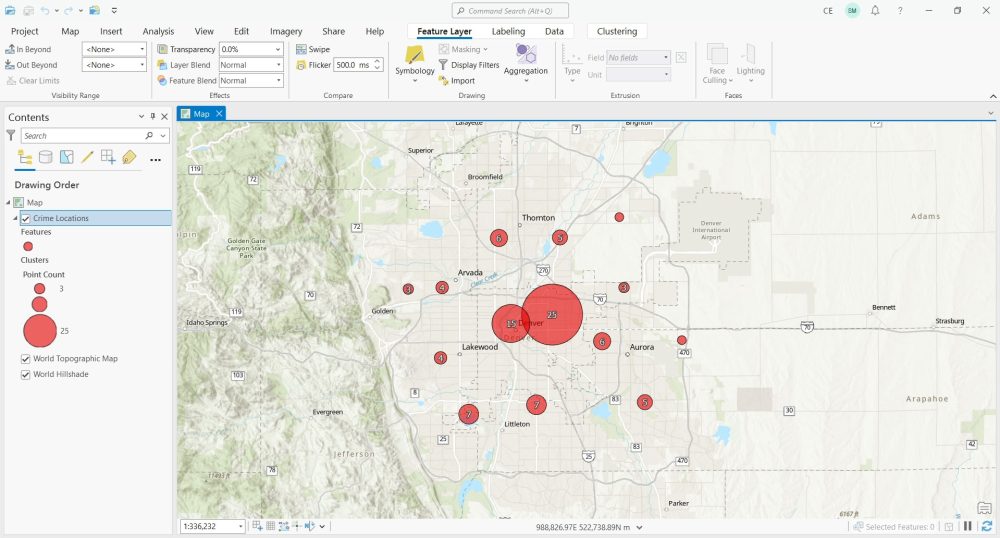
7. Point Clustering
Point clustering is a technique that groups points that are close to each other in space to help clean up the appearance of your data.
To use point clustering in ArcGIS Pro, click the “feature layer” tab… Then, go to “Aggregation” and select clustering.
One of the neatest things about point clustering is how it creates circles proportional in size and how it can render it on-the-fly.
If you have a lot of point data in your maps, it’s a really easy way to improve visual clarity.
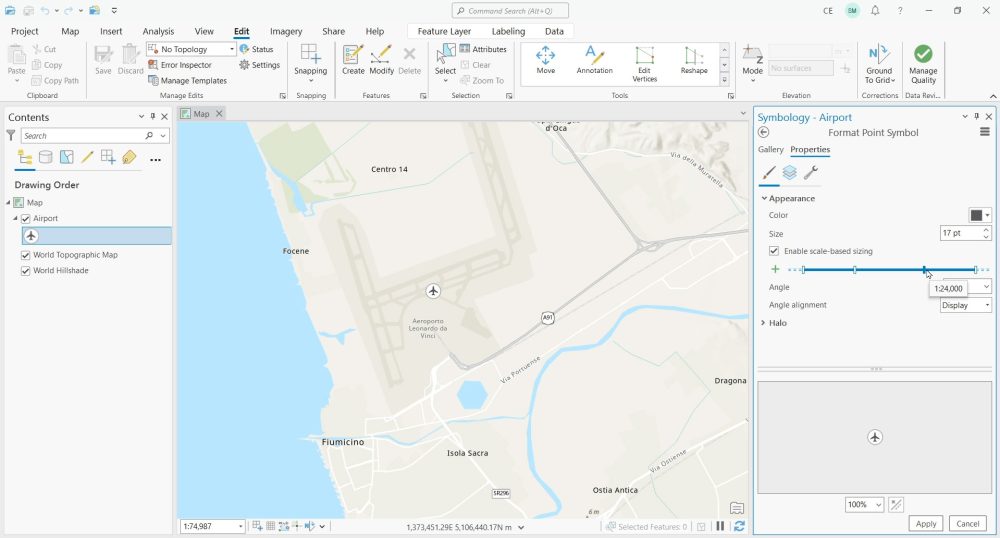
8. Scale-Based Symbol Sizing
The default way for ArcGIS Pro to display points is to show the same size of the point, no matter what your scale is.
But what happens if you want to make your points get bigger when you zoom into a map? It’s possible to change the size of your points using scale-based symbol sizing.
Double-click your symbol in your table of contents and click on “Properties”. After you enable scale-based sizing, you can add breakpoints to change the size depending on your map scale.
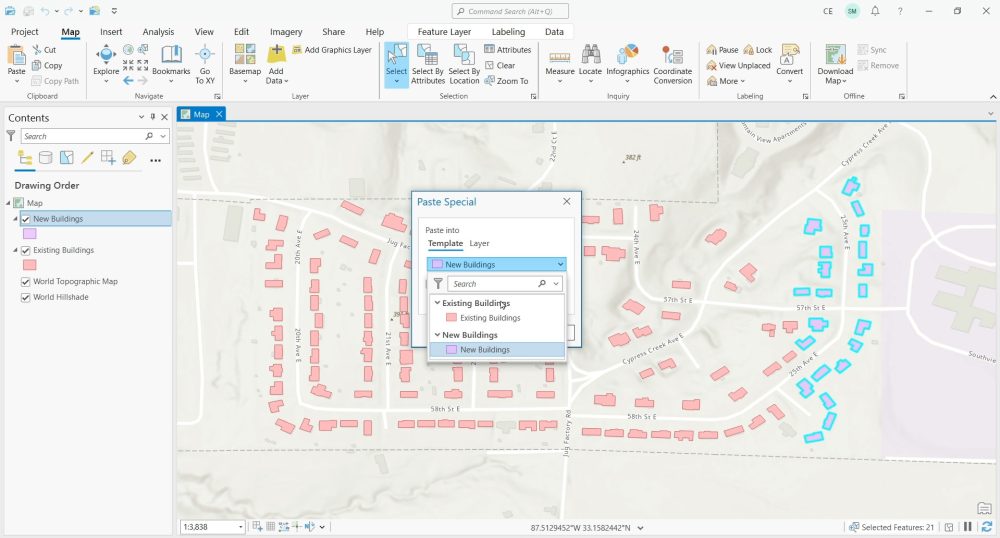
9. Copying Features
Copying data from one feature class to another was not always an easy task in ArcMap. But when it comes to ArcGIS Pro, it’s much easier.
First, select your features and click the “Copy” button. Next, select the drop-down in the “paste” button and select “Paste special”.
Now, all you have to do is select the layer you want to paste them into. Finally, push OK to copy your features over to a different feature class.
10. Organizing Favorites
ArcGIS Pro provides a new feature called “Favorites“. This feature allows you to save frequently accessed items. This can include everything such as folders, SDE connections, and geodatabases for easy access.
To add a favorite, you can right-click any folder and click add “Add to Favorites”. Then, you’ll be able to see it in your “Favorites” tab.
It’s also possible to add any folder by default in your project. You can do this by right-clicking any folder in your “Favorites” and selecting “Add to New Projects”.
Finally, another handy capability is being able to add any geoprocessing tools to your favorites. This is perfect for repeated use and easy access.

11. Project Packages
If you want to transfer an entire ArcGIS Pro project to someone outside of your organization, you can do this by using “Project packages”.
Packaging a project in ArcGIS Pro involves creating a self-contained package. This includes all the data, maps, and toolboxes required to share a project with others.
To create a “project package”, first you can click on the “Share” tab in the ribbon menu. In the Share tab, click on “Package Project” under the “Packages” section…
From here, you can set the name, tags, summary, extent, and file location to share your project package.

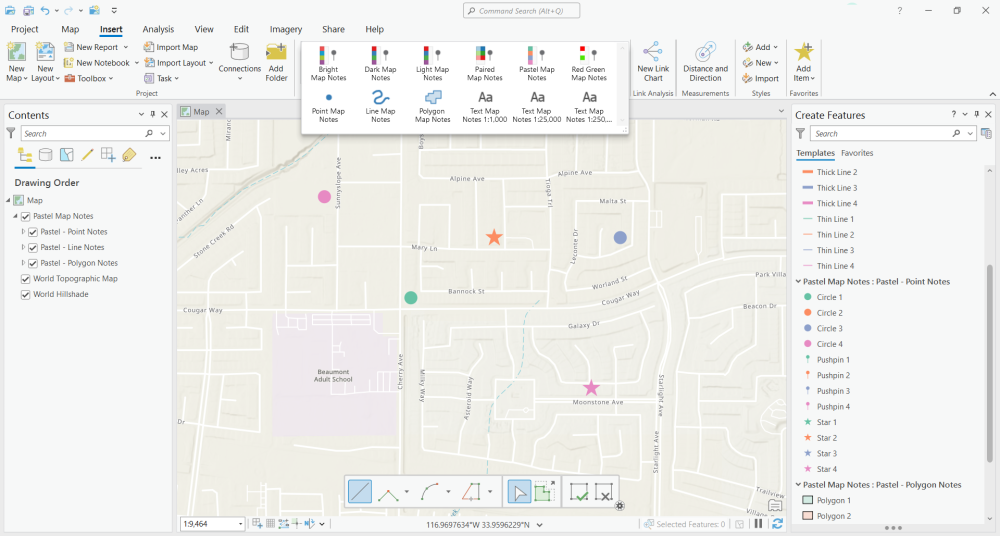
12. Map Notes
Map notes are a quick and dirty way to add points, lines, polygons, and annotations with little effort.
All you have to do is click the “Insert” ribbon and select a style of map notes including bright, light, dark, and pastel map notes.
To create features, just click on the “Edit” tab and start marking up your map. It’s as easy as that! You can also create lines and polygons as well, which is really convenient.
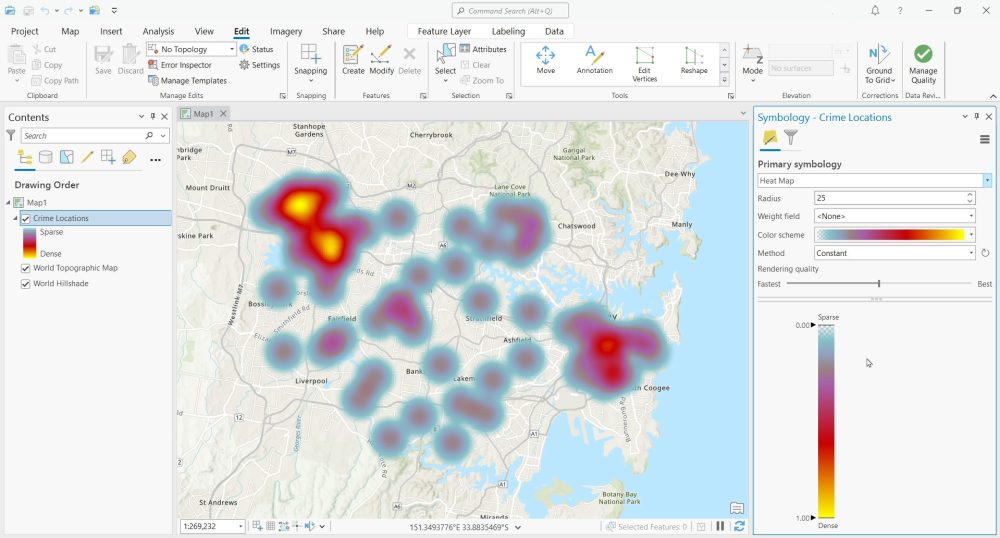
13. Heat Maps
One of the biggest improvements in ArcGIS Pro is that you don’t have to run the kernel density tool to generate a heat map.
Instead, it’s possible to create heat maps directly in the symbology of a layer. First, right-click your layer and select symbology. Next, change the type of symbol to “heat map”.
This will generate a heat map that shows the intensity of a variable across an area. You can change the color scheme, weight, and method if you want.
14. Schema Management
The schema management capabilities are another refreshing change to ArcGIS Pro.
If you want to add, delete, or alter a field, ArcGIS Pro has really simplified the process. For example, to add a new field, open your attribute table. Then, click the “Add Field” button.
This will open the “field view” where you can add or update the data types for your attribute tables.
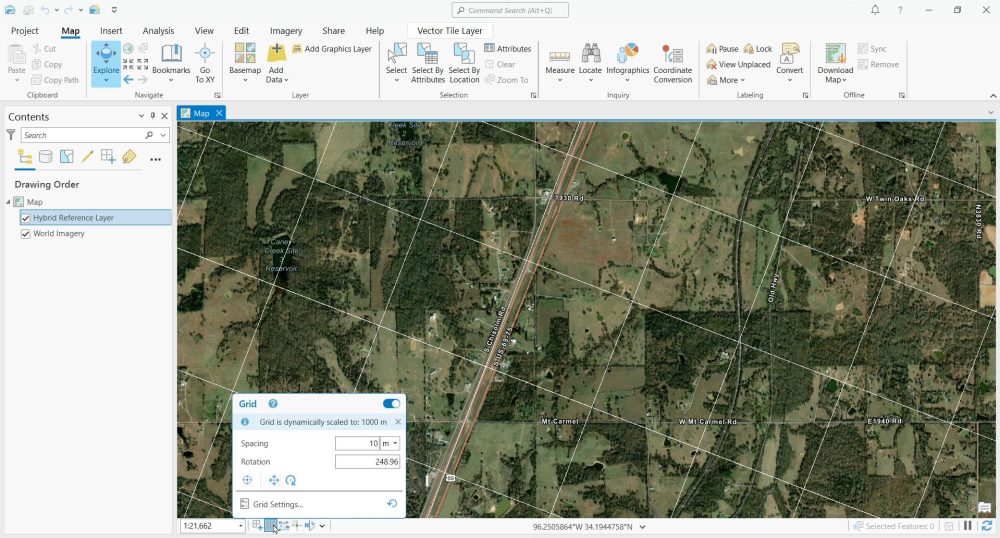
15. Editing Grids
Editing grids can add horizontal and vertical grid lines to your maps. You can find editing grids right next to the snapping tools at the bottom-left corner of your map frame.
It’s possible to change the amount of spacing and adjust the position and orientation of the grid to suit your needs. In the “Editor settings”, you can also change the grid line color, visibility, and snapping settings.
Also, if you’re looking for tips on Editing, don’t forget to check out our 15 Must-Know Editing Tools in ArcGIS Pro, which includes a video on how to use each editing tool.
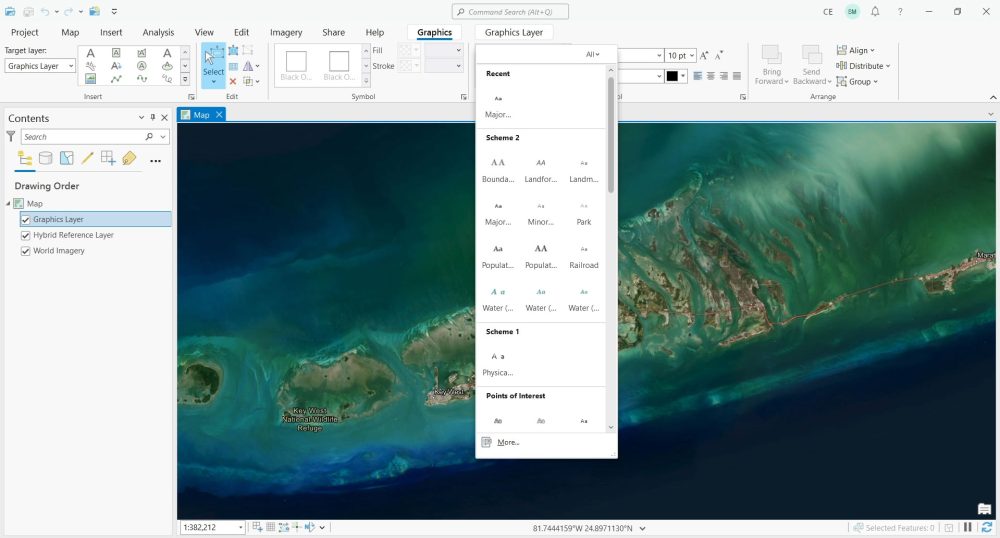
16. Graphic Layers
Esri has redesigned the graphic layers, which are similar to map annotation in ArcMap.
To add a graphic layer” make sure you are in your “Map view”, not your “Layout view”. Then, go into the “Map” ribbon and click “Add graphics layer”.
To edit the graphics layer, go to the “Graphics” ribbon. Select your target layer. Then, choose the type of text you want to add and click on the map.
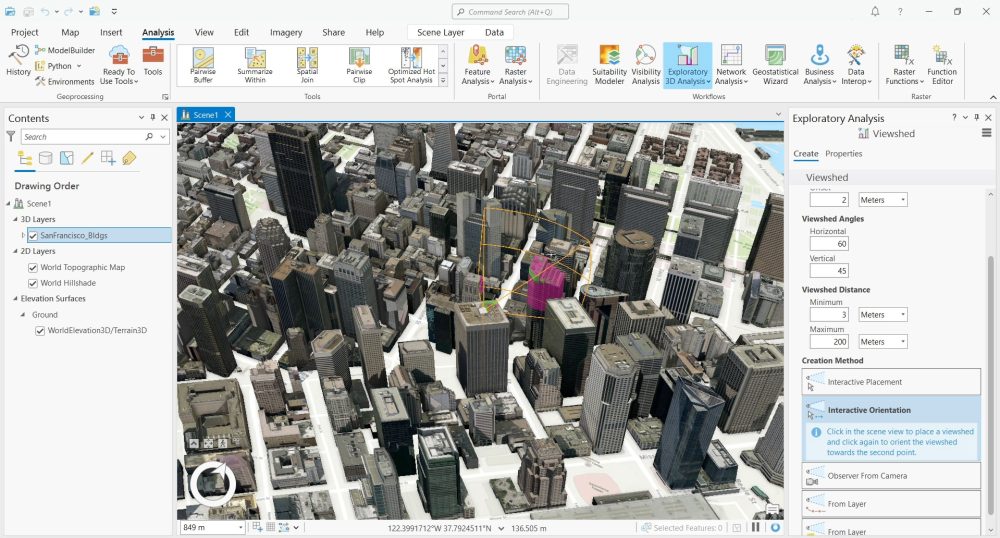
17. Exploratory 3D Analysis
Exploratory 3D analysis is one of the neatest additions to ArcGIS Pro. As the name suggests, it allows you to immerse yourself in a 3D scene and interact with your environment with a set of exploration tools.
For example, there are tools for cut and fill, view domes, object detection, viewsheds and line of sight.
To use the 3D exploratory tools, make sure you have a 3D layer in your map. Then, you can find it in the “Analysis” tab under “Exploratory 3D Analysis”.
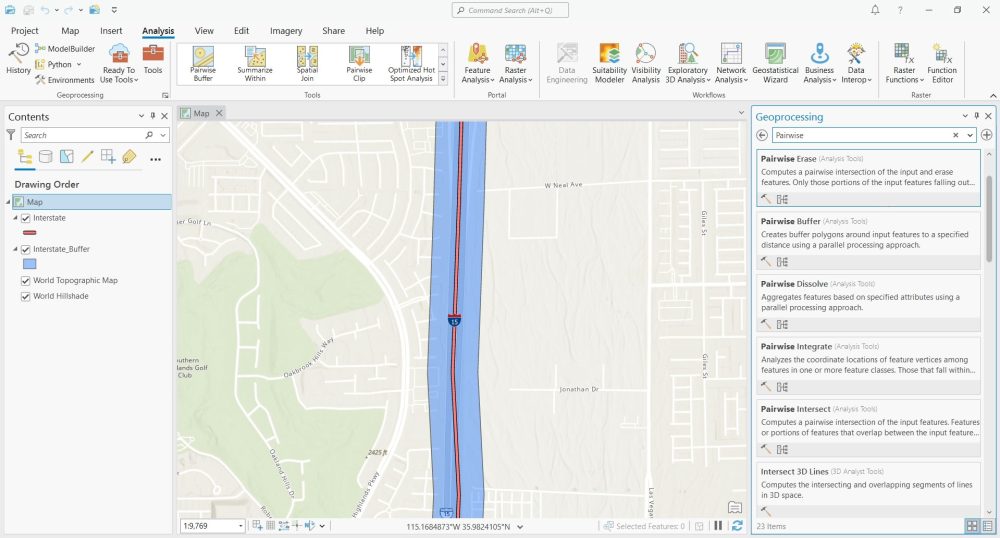
18. Pairwise Geoprocessing
Pairwise geoprocessing means that the tool will use parallel processing by default to run the process.
For example, some of the overlay pairwise geoprocessing tools include buffering, clipping, dissolving, erasing, and intersections.
But you should read the documentation for each tool before you run it as the output might vary slightly from classic geoprocessing tools.
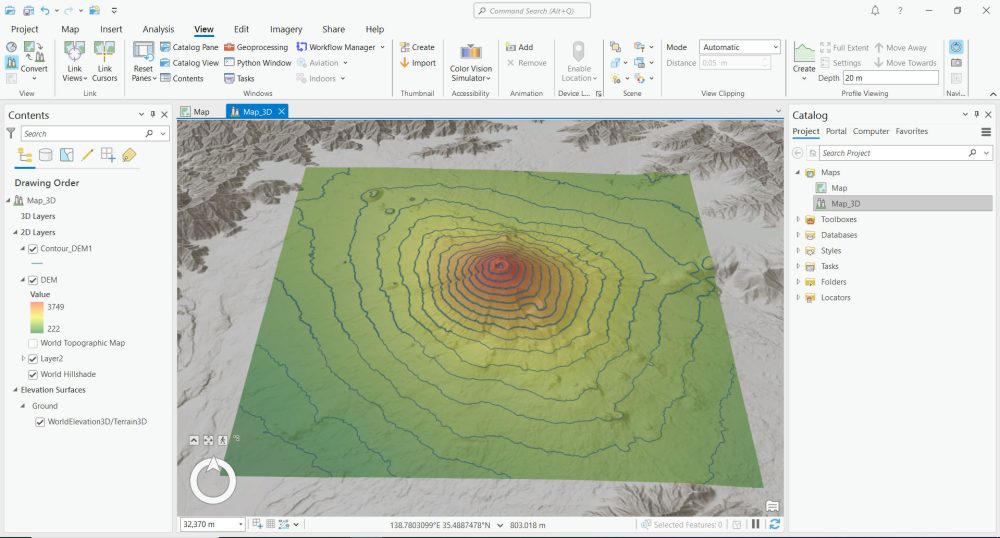
19. Convert to 3D Scene
To convert any map to a 3D scene, you can click on the “View” ribbon. Next, select the “Convert” drop-down and you’ll have to select either a global or local scene.
Once you convert the 2D map to a 3D scene, you can adjust the camera position to see your features in 3D.
This is especially useful if you are working with a digital elevation model and you want to see it in an immersive environment.
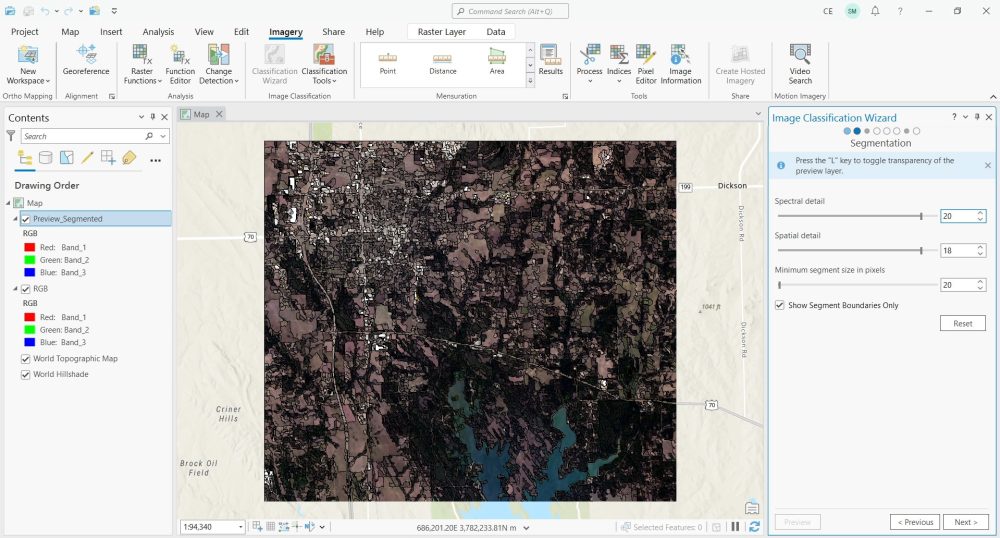
20. Classification Wizard
The “Classification wizard” is for any unsupervised, supervised, or object-based image classification.
The biggest advantage of the classification wizard is that you get to see your classification before you generate the results.
So if you don’t like what you see, you can keep on adjusting the parameters until you’re happy with the results of your image classification.
Conclusion
In this article, we counted down the top 20 tips and tricks for ArcGIS Pro.
From exploratory 3D analysis to heat maps and data engineering, we hope you enjoyed it.
But what did I miss? Please let me know in the comment section below.


A few points for clarity:
#11: To package the data you have to click -> Share -> Map button in the package section -> then in the Package Map pane click “Attachments”, then click the folder to add the files. I wish there was a drag and drop capability here.
#12: The map notes can be accessed by clicking Insert -> Layer Templates -> then the map notes appear.