How To Vectorize Images with ArcScan
Vectorize contours, parcels, and polygons from images
You can take any image, and vectorize it with a couple of clicks of a mouse using ArcScan. Okay, it doesn’t work perfectly every time… But it’s better than doing it from scratch.
This means you’ll spend less time digitizing vertices… And you’ll have more time to do other important things. Sounds good?
In this article, we’re going to get our hands dirty and vectorize a scanned image in ArcScan. Let’s get started.
READ MORE: Differences Between Raster and Vector Data
But first which software packages offer vectorization?
If you have an old map and you want to convert it to vector format, you have several options:
- Esri’s ArcScan
- Autodesk Raster-to-Vector Conversion
- Trimble eCognition
- QGIS Edge Extraction
Each one of these GIS software applications can lend you a helping hand and do all the work for you. At least most of it.
Here is how to vectorize a scanned image in ArcScan:
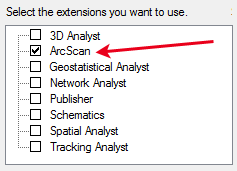
Step 1. Turn on ArcScan Extension
First, turn on ArcScan by clicking Customize > Extensions.
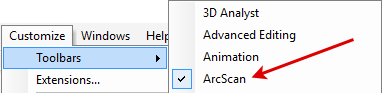
Step 2. Add ArcScan Toolbar
Add the ArcScan toolbar by selecting Customize > Toolbars > ArcScan.
Step 3. Reclassify Your Image to 0’s and 1’s
The nit-picky ArcScan doesn’t like your 256 color scans. It wants zeros and ones.
So this means you’ll have to reclassify your image using the Reclassify Tool. Admittedly, this will come with a bit of trial and error.
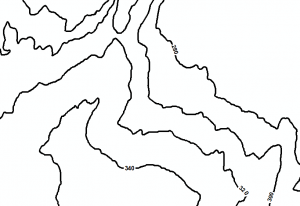
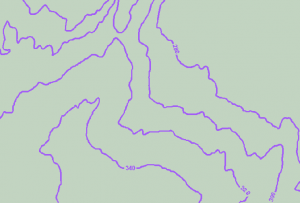
For example, here are the contour lines we want to vectorize that are already scanned from a paper copy:
To Reclassify, select Spatial Analyst Tools > Reclass > Reclassify. Here are the settings to convert this image into 0’s and 1’s:
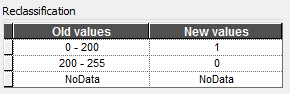
The result is an image with only zero (0) and one (1) values (binary raster). The grey has a value of zero. The purple has a value of one.
Please note: This step will influence how your vectors turn out. Make sure to experiment with different settings. You will want to find the happy-medium setting of not too many ones or zeros.
Step 4. Create a blank line shapefile or feature class
Your vectorized image will need a place to reside. This means you’ll have to create a shapefile or feature class to store them in ArcCatalog.

Step 5. Start an editing session
The ArcScan toolbar will be greyed out for now. At least until you turn on the editor. Click Editor > Start Editing in the Editor toolbar.

But after you have a binary raster and feature class ready to edit, your ArcScan toolbar will be activated.
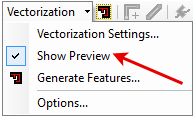
Step 6. Vectorize your image but first with a preview
It’s time to see how well your vectorized features will look given your image. You can see a preview by clicking Vectorization > Show Preview in the ArcScan Toolbar.
Step 7. Generate features
If you’re happy with how your preview looks, it’s time to generate the features. You can save these features by selecting Vectorization > Generate Features in the ArcScan Toolbar. In the template, choose the line shapefile or feature class that you have created in step 4.
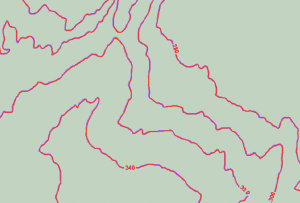
Here’s how our vectors look in red.
If you’re unhappy with your vector features, then take a look at step 8 on how to solve your issues.
Step 8. Other ArcScan options
ArcScan gives you some options to improve your vectorization. The first option you can look into is by clicking Vectorization > Vectorization Settings > Styles in the ArcScan Toolbar. When you tell ArcScan the type of features in the image (contours, parcels, etc), it will change how features will be vectorized.
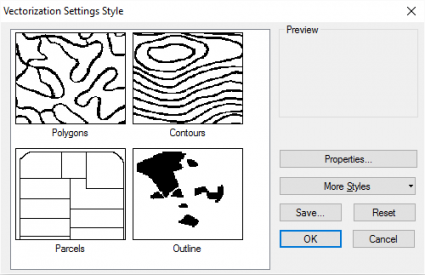
You can also experiment with the intersection solution, smoothing weight, fan angle, etc. But the pre-customized styles are often the better option.

The next thing to try is to physically alter the original image you vectorized. To do this, you can use the raster painting tools by selecting Raster Cleanup > Raster Painting Tools. This is good for removing labels and connecting contour lines.
Why vectorize data in the first place?
Vectors store valuable attributes for spatial analysis.
You can resize vector data in programs like Adobe Illustrator and make it fit a skyscraper without the pixelated look.
Lastly, vector paths can be used for networks with correct topology.
What are your thoughts about using ArcScan? Or are there any better ArcScan alternatives? Let me know with a comment below.


As another option try using the raster to polygon tool
In step 3, it is not necessary to reclassify raster, simply the raster symbolization must contain only 2 colors.