Converting LAS Format to DEM in ArcGIS
How to Create DEMs from LAS files with ArcGIS 3D Analyst
Light Detection and Ranging (LiDAR) is a distance technology. It sends a pulse to the ground and waits for that same pulse to return to the sensor.
Meanwhile, it records the time during the sent and returned pulse. And during this process, it’s all recorded in LiDAR LAS files.
How do you read point clouds or LAS files with ArcGIS 3D Analyst?
Let’s go step-by-step from a dense point cloud to a digital elevation model and digital surface model.
READ MORE: A Complete Guide to LiDAR: Light Detection and Ranging
LAS File Format
The LAS file format is a binary file format specifically for the interchange between vendors and customers. Overall, LAS files maintain information specific to LIDAR without the loss of information.
LAS files are available for public use, unlike ASCII and other proprietary file formats. The dense networks of coordinate point measurements are so large that they often need to be split to prevent the file size from becoming too large.
When you compress a LAS file, the file format specifically for this is LAZ. You can save significant storage space using the LAZ file format. Like most file compression, LAZ has no information loss.
How do we convert LAS files in ArcGIS into DEMs, DSMs, or other outputs? To start this tutorial, you’ll need an ArcGIS 3D Analyst extension and a sample LAS Dataset from these top 6 free LiDAR sources.
Step 1: Turn on the 3D Analyst Extension in ArcCatalog.
- We’re going to start in ArcCatalog. You’ll need to turn on the 3D Analyst which can be done by clicking Customize > Extensions. Click the checkmark for 3D Analyst.
We are ready to use the LAS toolset associated with ArcGIS.
Step 2: Create a File Geodatabase.
- In ArcCatalog, let’s create a file geodatabase. Right-click anywhere in the ArcCatalog window, and select New > File Geodatabase. Feel free to change the name of the file geodatabase.
We now have a file geodatabase, which will be the storage container for our LAS files.
Step 3: Create a Feature Dataset.
- Double-click the file geodatabase and create a new feature dataset.
- Right-click > New > Feature Dataset. Give the feature dataset a name – for example, “data” – and click Next.
- Select the coordinate system that your LiDAR data is in – for example, “State Plane” – and click Next.
- Select the vertical coordinate system – for example, NAVD 1988 – and click Next.
- For tolerances, you can accept the defaults.
This feature dataset set will be used to store the multipoint file. It also configures the horizontal and vertical coordinate systems that the LAS files are in.


Step 4: Add LAS Files into a Feature Dataset as Multipoint.
- Double-click the LAS to Multipoint tool in the 3D Analyst Toolbox. 3D Analyst Tools > Conversion > From File > LAS to Multipoint.
- Browse for Files. Add your LAS files.
- Set your output feature class. It will reside in the feature dataset that you created in Step 3. Give it a name like multipoint.
- The average point spacing for this LiDAR dataset is approximately 1 meter, which is reasonable to expect for LiDAR data.
- You have the option to select class codes and the return value. In this case, we’ll leave the default and choose no class codes and any return values.
- For input attribute names, we’ll select the intensity and the number of returns. However, this is optional to include any attributes in the resulting multipoint feature class.
- Select the input coordinate system as you did in Step 3, such as the State Plane Coordinate System or Universal Transverse Mercator (UTM).
- The file suffix is a LAS data type, and the Z-factor could be used to change meters into feet. But we’ll use both of these inputs as the default. Click OK.
Working with all LiDAR data, you have to be patient. The result of this step will be a multipoint feature class in your feature data set.
Step 5: Create a New Terrain in the Feature Dataset
- Right-click your feature dataset and click New > Terrain. This will create a TIN surface from your multipoint feature class.
- Give your new terrain a name. Select the multipoint feature class that you created in step 4. The approximate spacing is about 1 meter apart. Click next, and next again.
- The next window is for how the terrain dataset will create pyramids. The default is fine here. In the next window, you can click “Calculate Pyramid Properties”. This helps to speed up loading times when viewing in ArcMap. Click Next and finish.
- You will be prompted with a message box- The new terrain has been created. Would you like to build it now? Select yes and the tool will create the terrain with pyramids.
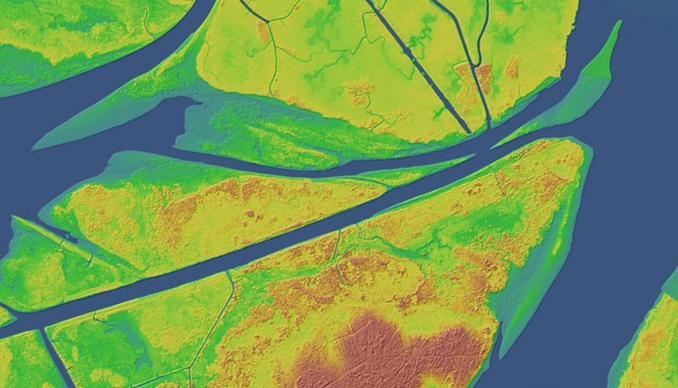
Step 6: Inspect your Terrain Dataset in ArcMap
- Drag and drop the terrain dataset in ArcMap.
If we only use the bare earth returns, it would generate a digital elevation model. If we take the returns that include features like buildings and tree canopy, it produces a digital surface model. We also have a number of returns, light intensity, and point classification.
What’s Next?
LAS files are public binary file formats specifically for storing LiDAR data.
LiDAR gives you accurate bare ground measurements all in a dense point cloud. But this is just one of the various uses and applications of LiDAR.
In ArcGIS 3D Analyst, bare ground hits produce a digital elevation model (DEM).
Alternatively, the first returns are for digital surface models (DSM)
READ MORE: DEM, DSM & DTM Differences – A Look at Elevation Models in GIS